m10 x 1.25 socket head cap screw how to measure the straightness of the screw?
Sometimes for some reason, the screw part of the m10 x 1.25 socket head cap screw will have a slight bending or obvious bending. The main reasons are: the screw is too long, the material is not hard enough; the transportation process is caused by etc. At the time of assembly, once the straightness of the screw portion exceeds the tolerance, it cannot be used. In this case, how do you measure the straightness of the screw?
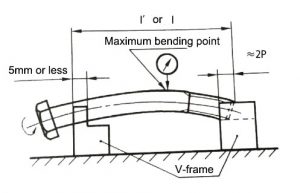
Method 1: Place the m10 x 1.25 socket head cap screw to be measured on the V-frame specified in GB/T 1219 (see Figure 1). Use the dial gauge specified in GB/T 1219 to measure at the Max bend. Turn one revolution and measure the difference in the pointer reading Max, 1/2 of which is the measured value.

figure 1
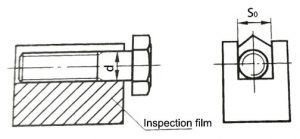
Method 2: Screw the screw of the m10 x 1.25 socket head cap screw into the special inspection mold with internal thread (the hole diameter d’=dmax+t) by hand, and screw it into 2 turns or more (calculated by screwing back the screw) (see Figure 2). .

figure 2
Method 3: Put the screw into the special inspection mold by hand (S0=dmax+t), it should be free to choose 360 ° (see Figure 2)
Method 4: Measure with the inspection platform and feeler gauge specified in JB/T 8788.
If you want to customized m10 x 1.25 socket head cap screw please send an email: annie.li@szsst88.com